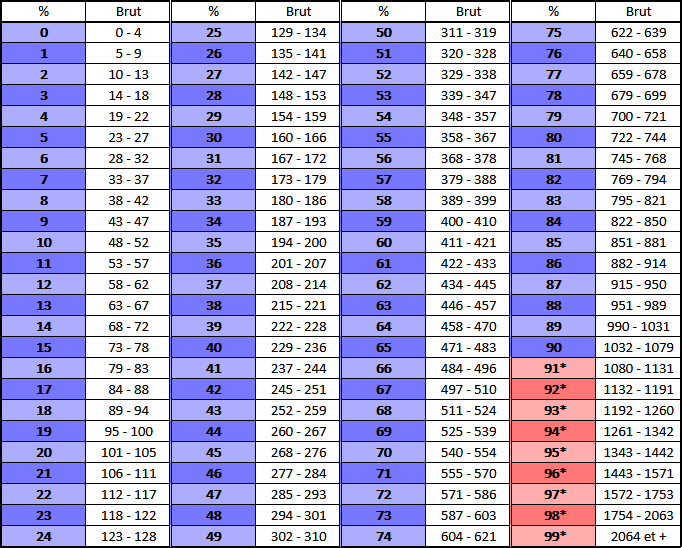
0 – Disclaimer
This article was not created to substitute the in-game tutorial. The point is to give more info, knowledge, and better understanding of the game, the fights, and the theorycrafting involved.
Therefore, this article assumes that you already know the basics thanks to the in-game descriptions, tooltips and tutorials.
1 – Basic concepts
1.1 – Hardcap and conditions
While out of combat, some character stats are capped :
- The max AP is 16.
- The max MP is 8.
- The max WP is 20.
Those caps aren’t active during a fight and can be exceeded thanks to bonuses :
- active spells, like Motivating Shot (Osamodas) which gives 2 AP ;
- passives, like Energy Moderator (Foggernaut) which gives 1 MP when it procs ;
- the Swiftness Bonus Enthusiasm which gives 2 AP ;
- sublimations, like Wield type: Shield which gives 1 MP.
Some equipments give negative % Critical Hit. Since such items give more stats in return, you could be tempted to equip a lot of them. Because of this, they require you to have at least -9%ch in your character sheet.
Equipment with a condition won’t become unequipped if the condition is invalidated during the fight (e.g. if an equipment states “50%ch or less”, starting the fight at 50%ch then getting to 70%ch with a buff during the fight won’t unequip the item).
On top of the out of fight hardcaps, there are permanent limits as well :
- Additional % Critical Hit past 100% won’t increase the character’s damage (except for Ecaflips that behave differently)
- They still count towards the %ch total. If a character with 107%ch (therefore 100%ch on the character sheet) gets a -20%ch debuff, they get to 87%ch, not 80%ch.
- Players and friendly summons can’t go past 90% resistances, reached at 1032 resistances.
- Enemy monsters aren’t affected by this resistance cap. Some monsters can reach 91% resistances (or more !).
- Players can’t remove more than 200 resistances on an enemy.
- Resistance removal due to enemy mechanics don’t count.
A monster losing 300 resistances due to a mech (from a monster or from the dungeon) can still lose 200 resistances due to player actions, for a total of a -500 resistances loss.
- Resistance removal due to enemy mechanics don’t count.
- Regarding % damage inflicted, also called “%di“, there’s a minimum : you can’t go below a total of -50%di.
- A character supposed to deal damage with a total of -80%di will instead deal damage as if they had -50%di.
- %di that aren’t displayed on the character sheet, such as conditional %di (e.g. ranged %di), or the drawback from the Theory of Matter sublimation, do not bypass this limit.
If I have -50%di on my character sheet and I get a “-20%di for ranged damage”, I’ll keep dealing damage with a total of -50%di, even for ranged damage.
Pets and mounts need to be alive to give their bonus stats.
1.2 – Turn time
The base turn time for a character is 30 seconds, to which we add 0.5 seconds per AP or MP owned at the start of the turn.
A character with 12 AP and 6 MP will then have 30 + 0.5 * (12 + 6) = 39 seconds each turn.
On the first turn, each character gains a bonus of 30 seconds.
During a Swiftness Bonus turn, characters also get a bonus of 30 seconds.
Finally, to reward fast turns and to prepare “big” turns :
When a character passes their turn with some seconds remaining, they transfer all of their remaining seconds for the next turn, capped at 90 seconds transferred.
A character with 12 AP and 6 MP can then reach 129 seconds of turn time. During a Swiftness Bonus turn, they can reach 159 seconds.
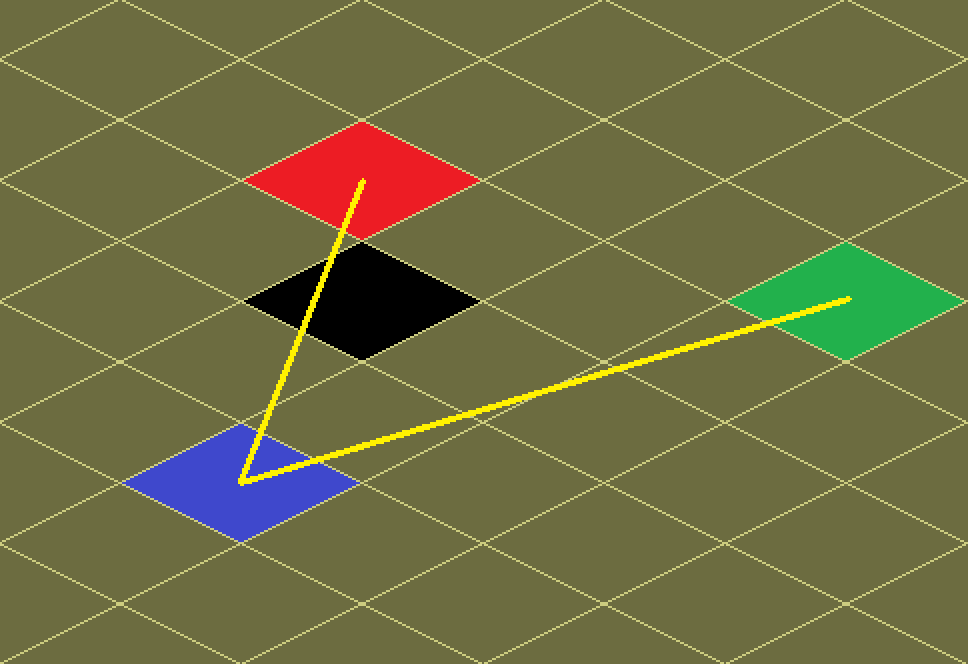
1.3 – Turn order
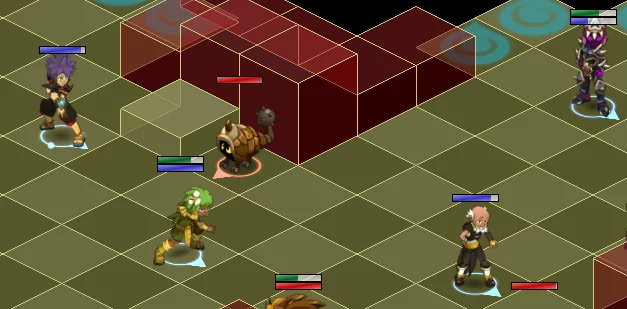
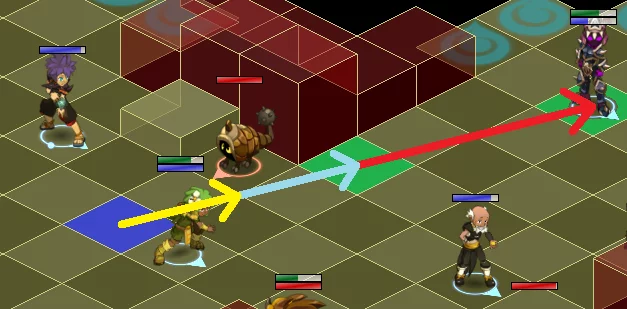
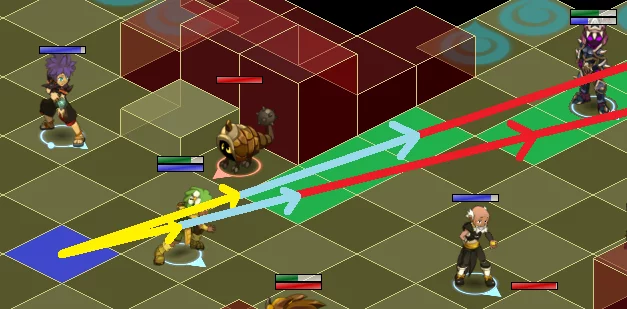
The order of fighters in a fight has several rules.
The team with the highest average initiative is the first one to play.
On rare occasions, playing before the Boss of a dungeon can be useful, as this avoids a dangerous first turn from the Boss. Some examples include the Whirly dungeon (Level 111) and the Iced-Over Crest and Pandala Tomb dungeons (Level 186).
It’s possible to play before the first monster, or even before the Boss of a dungeon, if the team invested enough stats in initiative.
Let’s say there’s a team A (3 fighters) and a team B (6 fighters). Let’s say team A plays first :
- The order of fighters within a team is in descending order of initiative. In a specific team, we always choose the one who has the highest initiative of the team among the fighters who have not played their turn in the current round yet.
- We alternate between each team : team A, then B, then A, then B, etc.
- If the teams don’t have the same amount of fighters, one team will end up not having any fighters left that need to play, while the other team will still have some fighters that need to play. Therefore, all remaining fighters from the other team will play their turns one after the other.
- If we take our example, we get : A1 → B1 → A2 → B2 → A3 → B3 → B4 → B5 → B6.
The image below illustrates this order.
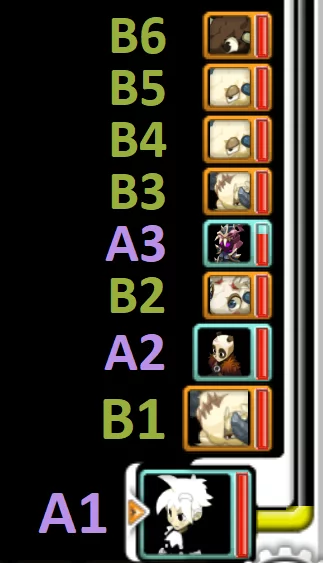
In other words :
- Since team A plays first in our example, the fighter with the highest initiative in team A plays first.
- Then, the fighter with the highest initiative in team B will play. Then, it will be…
- … the second highest initiative in team A.
- … the second highest initiative in team B.
- … the third highest initiative in team A (which is the last fighter in the team).
- … the third highest initiative in team B.
- Team A no longer has fighters that need to play, so the remaining fighters in team B will play their turn, which are…
- … the fourth highest initiative in team B.
- … the fifth highest initiative in team B.
- … the sixth highest initiative in team B (which is the last fighter in the team).
Once this order has been decided, it’s fixed. If the B2 monster dies, we don’t start the order calc again. The monster is simply removed from the chain and the order remains unchanged. The same goes for a player that gets K.O’d or disembodied.
A fighter that gets resurrected returns to the chain in their initial spot (in the order fixed at the beginning of the fight).
Usually, a summon plays just after the summoner.
1.4 – Monster AI
Monster AI behavior can’t be predicted with 100% accuracy. Sometimes, said behavior can feel a bit wonky (doing round trips, or even passing their turn without doing anything on rare occasions), but we can write some general rules :
- Monsters seem to prefer dealing damage to players with the least resistances.
- Monsters seem to prefer dealing rear damage (or side damage if not possible).
- Players with high resistances can turn their back, hoping they will get target rather than fragile players.
- Monsters with AoE spells prefer hitting multiple targets at the same time, rather than an isolated target.
Some monster actions are performed automatically at the start of their turn. Usually, during a Swiftness Bonus turn, those actions happen before the bonus is taken.
Therefore, some monsters (or even Bosses) sometimes attack players before receiving a %di buff.
2 – General mechanics
2.1 – Spell effects
Effect descriptions on spells have a shared formatting which makes it easier to parse info.
Most icons can be hovered with the mouse to display the meaning.
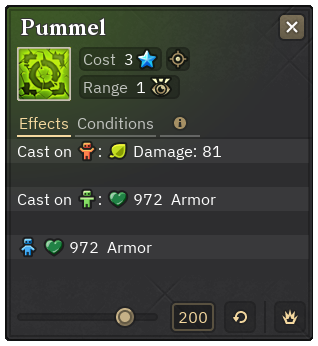
- At the top, we can see, in order :
- The spell costs 3 AP ;
- It’s a single target spell ;
- Range is 1 tile from the caster.
- Colored character icons let you know the type of target. The arms also have different positions depending on the type of target.
- Red character (with arms up) means enemies. We can see that, if the spell targets an enemy, it deals damage with the earth element.
- Green character (with arms towards the sides) means allies. We can see that, if the spell targets an ally, it gives some armor to them.
- Blue character (with arms down) means the caster. We can see that the spell gives armor to the caster, no matter the target (enemy, ally, or even the ground).
Most spells have their effects listed in order of procs. The spell in the last example gives armor to the caster after other effects.
If we target a monster which has a counter-attack mechanic, we can get hit before we get the armor, which means the armor gained won’t protect us from the counter-attack (or from death by counter-attack, even).
Another example :
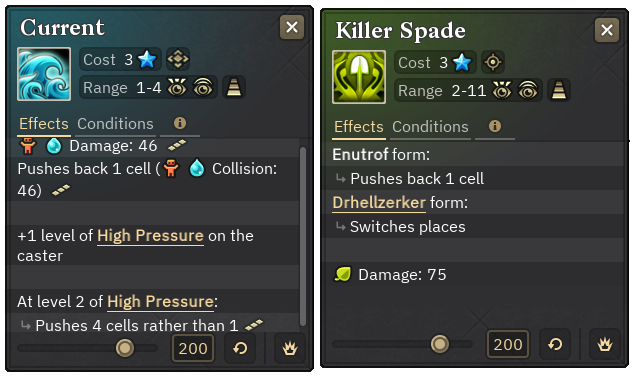
- For the Current spell, we see at the top, in order :
- The spell costs 3 AP ;
- It’s an AoE spell ;
- Range is 1 to 4 tiles, and the spell needs a line of sight (otherwise the eye would be crossed out) ;
- The spell can only be casted in a line ;
- Range can modified (eye with two waves above) by the character’s Range stat, given by equipment and states.
The modification is applied automatically. The spell Killer Spade doesn’t have 11 base max range, that’s due to equipment.
- The push effect from Current affects all targets (no character icon), but damage is only dealt to to enemies (red character icon).
- For Killer Spade, the absence of character icon means effects are always applied on the targetted tile, which includes damage.
We can notice several differences between both spells. In particular :
- Current only deals damage to enemies, while Killer Spade always deals damage ;
- Current deals damage before pushing, while Killer Spade deals damage after pushing.
It’s important to pay attention to the description, and the order of effects.
For Killer Spade, the push before damage might prevent the Melee Mastery from activating. While in Drhellzerker mode, the position swap can give the monster’s rear before dealing damage.
Okay, let’s get one last example.
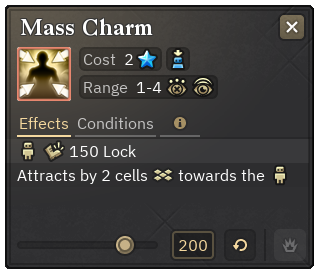
- This time, the eye is crossed, so the spell doesn’t need a line of sight.
- Next to the AP cost, we can see that the spell can be cast on self.
- Be aware that “1-4 range, and can be cast on self” isn’t the same thing as “0-4 range”. If we lose 5 Range due to a state, the former becomes “1 range, and can be cast on self” while the latter becomes “0 Range”.
- The beige character icon without arms is the target of the spell. This can be an ally, an enemy, or self.
The description therefore states that the target gains 150 Lock (not the caster), and there’s an attraction towards the target.
2.2 – %HP, %di, %fd
% Health Points bonuses are additive to each other and then become a multiplier on max HP :
- All %HP sources are additive to each other.
If I have +160% from characteristics and +30% from the Healing sublimation, I get to +190%, which becomes a x2.9 multiplier. - All HP max sources (characteristics, equipment, passives) are affected by the %HP stat.
If I have +160% from characteristics, a passive that states “+1200 HP” will actually give 3120 HP.
% damage inflicted bonuses are additive to each other and then become a multiplier on damage dealt :
- All %di sources are additive to each other.
If I have +20%di then get another +50%di, I get to +70%di, which becomes a x1.7 multiplier.- All % damage received states on the target are added to the caster’s %di.
If I have +70%di and if the target has +30% damage received, I get to a total of +100%di. - All indirect damage % (or indirect %di) is added to the caster’s %di for indirect damage.
If I have +100%di and +30% indirect damage, I get to +130%di for indirect damage only.- The Scalded state on the target (+10% indirect damage received per level) is additive to indirect %di.
If I have a total of +130%di for indirect damage and the target has Scalded 3, then I deal damage to the target with a total of +160%di for indirect damage.
- The Scalded state on the target (+10% indirect damage received per level) is additive to indirect %di.
- All % damage received states on the target are added to the caster’s %di.
When a spell description states “% extra damage”, this sometimes is a separate multiplier and not a %di buff. In those cases, we don’t add them to each other and we don’t add them to %di either, but rather apply a separate “final” multiplier on damage. We can call that % final damage or %fd :
- Foggernaut :
- the “+% damage” of Shebang depending on SP.
- the “+100% damage” when we upgrade the Turret to level 2, which is a x2 multiplier (or x3 at level 3, and x4 at level 4), and the Hypertension spell which brings another x1.3 multiplier on Turret damage (not +30%di).
A Turret at level 2 with Hypertension on the target will then deal damage with two multipliers, x2 and x1.3, for a total multiplier of x2.6, which doesn’t have anything to do with %di (rather than simply adding everything together and getting +130%di).
- Cra : the cumulative “+50%” on Plaguing Arrow.
- Enutrof : the “-80% ranged damage suffered” of the Drheller.
- Huppermage : the “+% damage” of Twilight Beam depending on QB.
- Iop :
- the “+50% damage” with Charge on an enemy with Charged.
- the “+% damage” on spell costing 4 AP or more depending on the level of Wrath.
- the “-25% damage suffered” when the Iop is on Defensive Stance (Earth)
- Osamodas : the “+5% damage per MP remaining” on Crushing Hyphalump’s Fungal Impact.
- Pandawa : the “+10%” on Lactic Acid and Blisskrieg when carrying a Barrel.
- Rogue : the “+% damage” on Detonation (single target) and Carbine for rebounds on bombs.
- Sram : the “+% damage” on Trauma, Execution, Scam, and the passive Brutal Assault.
- Xelor : +50% on Distorsion each time the current hour goes full circle.
- Ogrest : his damage buff when starting the fight at level 215, 230, or 245 (+20%, +40%, or +60%), his “+% received” by Critical Weakness and Non-Critical Weakness in Turquoise, the “-90% received” from the artifact Jumpin’ Gap Jacks.
- Harebourg : his state “+% inflicted and received”.
- Shadowfang : her “-20% received” when she’s close to her Shadow.
- The damage multiplier from the dungeon difficulty.
- Sublimations Blocking Expert and Single Block whose damage reductions are multipliers (not additive to %di, and not additive to the usual “-20% received” when blocking).
Multipliers from critical hits, side damage and rear damage can be considered as %fd since those are separate multipliers and not %di gains.
2.3 – Armor, %armor, %heals
Character armor is capped to 50% of said character’s max HP.
For player summons, this cap is 100% of the summon’s max HP instead.
Enemy monsters don’t have an armor limit.
Critical hits increase armor given by x1.25, just like damage spells.
… except for Osamodas’ Animal devotion passive whose armor values from earth spells aren’t increased by critical hits.
Armor given and received isn’t increased by Masteries, but by two stats :
- % Armor Given sources are additive to each other. They increase armor given to others only, not to self.
- % Armor Received sources are additive to each other. They increase armor received from others and from self.
For Armor calculation, if the caster isn’t targeting themselves, the % Armor Received stat of the target is added to the % Armor Given stat of the caster, before forming a multiplier.
Critical hits increase heals performed by x1.25, just like damage spells.
… except for Osamodas’ Animal devotion passive whose healing values from air spells aren’t increased by critical hits.
Healing is increased by Masteries when applicable, except Rear Mastery, but two other stats also count :
- % Heals Performed sources are additive to each other. They increase heals performed to others and to self.
- % Heals Received sources are additive to each other. There are two types of % Heals Received :
- % Heals Received from allies only, e.g. % Heals Received from characteristics (we see a green character, which means it only increases heals from allies).
- % Heals Received, plain and simple, which increases all heals received, from allies or from self, e.g. the Rock passive.
Applicable % Heals Received increases (either both types, or the second type only) of the target add to the % Heals Performed of the caster for healing calc.
Be aware that % Heals do not affect Life Steal or healing expressed in percent of HP (max, missing, or current).
Also, healing expressed in percent of HP isn’t increased by Masteries, for obvious reasons.
… what do you mean my 2900 Masteries aren’t increasing my healing of 10% max HP to 300% max HP ? It’s not fair 🙁
2.4 – Healing resistance
To prevent players from healing forever and winning a fight by sheer attrition alone, there’s a healing resistance system. It goes up with each healing received by a character, and reduces the amount of healing they receive.
Healing resistance is counted separately for each character.
Monsters don’t have a healing resistance counter.
We gain +1% healing resistance every 5% max HP received as healing.
This increase always happens, even when the healing value is below 5% max HP, but that increase is below +1%. You won’t see it every time since the in-game display doesn’t show decimals.
Healing resistance isn’t additive to % Heals, it’s a separate multiplier.
This also means that reaching 100% healing resistance reduces healing received to 0.
2.5 – Incurable, Crumbly
Incurable is a state applied by specific spells from players and monsters. It reduces healing received.
This reduction is expressed in percentage (10% from Incurable 1, 20% from Incurable 2, etc.) but it isn’t additive to % Heals : it’s a separate multiplier.
Incurable 5 halves the heals you receive, while Incurable 10 reduces them to 0.
Crumbly is a state applied by specific spells from players and monsters. It reduces armor received.
This reduction is expressed in percentage (10% from Crumbly 1, 20% from Crumbly 2, etc.) but it isn’t additive to % Armor : it’s a separate multiplier.
Crumbly 5 halves the armor you receive, while Crumbly 10 reduces it to 0.
Trying to apply Incurable or Crumbly to a target that already has it won’t add it to the state that is already there.
If the state value is higher than the one already there, it replaces it. If not, nothing happens.
2.6 – Lock, Dodge
When two opposite team characters are adjacent and one of them is trying to walk away, the Dodge stat of the one trying to leave the tile is compared against the Lock of their opponent. Depending on how much higher one stat is compared to the other and the character’s orientations, the one trying to move has to pay MP (or AP even) in order to be able to move.
Locking and Dodging only affect natural movement, and not movement through spells.
- From levels 1 to 49 of the character that is moving, the max loss is 2 MP and 2 AP.
- From levels 50 to 99 of the character that is moving, the max loss is 3 MP and 3 AP.
- From level 100 onwards of the character that is moving, the max loss is 4 MP and 4 AP.
The possible losses are, in order of severity :
- No loss
- 1 MP
- 1 MP and 1 AP
- 2 MP and 1 AP
- 2 MP and 2 AP
- 3 MP and 2 AP
- 3 MP and 3 AP
- 4 MP and 3 AP
- 4 MP and 4 AP
To know in advance which values give which losses, you can use Ectawem’s calculator.
The opponent’s Lock stat is less effective from said opponent’s side, and even less effective from their rear. On top of that, the maximum loss is reduced depending on the orientation : reduced by 1 AP from the side, and reduced by 1 AP and 1 MP from the rear. Therefore :
- From levels 1 to 49, the max loss is :
- 2 MP and 2 AP from the front ;
- 2 MP and 1 AP from the side ;
- 1 MP and 1 AP from the rear.
- From levels 50 to 99, the max loss is :
- 3 MP and 3 AP from the front ;
- 3 MP and 2 AP from the side ;
- 2 MP and 2 AP from the rear.
- For levels above, the max loss is :
- 4 MP and 4 AP from the front ;
- 4 MP and 3 AP from the side ;
- 3 MP and 3 AP from the rear.
From the opponent’s front :
- There’s no loss if the character’s Dodge is 1.95 times higher than their opponent’s Lock ;
- The 4 MP (and 3 AP) loss is reached when the opponent’s Lock is 1.95 times higher than the character’s Dodge.
- For both of these points, the threshold is slightly lower than 1.95 ; we rounded up for convenience. The value 1.95 is imprecise but sufficient.
- The max loss (4 MP and 4 AP) is reached when the opponent’s Lock is 2.5 times higher than the character’s Dodge.
2.7 – AP, MP and Range removals
AP and MP removals depend on the caster’s Force of Will (FoW) and the target’s FoW.
For example, if a spell displays a 4 MP removal, that’s just the maximum value, and the actual removal can be lower due to FoW.
Values displayed on spell descriptions are the maximum possible removals.
To prevent removals with decimals after applying FoW, a removal can be expressed in percentage, such as “40% chance of removing 2 MP, and 60% chance of removing 3 MP”.
The higher the caster’s FoW is compared to the target’s, the higher the removal will be.
- Maximum removal is reached when the caster has at least 100 more FoW than the target.
- At equal FoW, half of the removal is dealt.
- No loss is inflicted when the target has at least 100 more FoW than the caster.
For other cases, it’s linear. For example :
- If the caster has 75 more FoW than the caster, 7 eighths of the removal are inflicted.
- If the caster has 50 more FoW than the caster, 6 eighths (or 3 quarters) of the removal are inflicted.
- If the caster has 25 more FoW than the caster, 5 eighths of the removal are inflicted.
- etc.
As a result, gaining 10 FoW adds one twentieth of the removal inflicted by the caster.
For a 2 MP removal, this is +10% chance for the next MP.
For a 4 MP removal, this is +20% chance for the next MP.
To check removal values based on FoW values, you can (again) use Ectawem’s calculator.
Performing a collision attempts to remove 1 AP to the character(s) involved in the collision.
This removal also depends on FoW, so it’s not uncommon to see “-0 AP”.
AP and MP removals increase the target’s FoW (+10 FoW per AP and/or MP lost), increasing their removal resistance and allowing them to improve the removal they can inflict on others as revenge.
FoW increases for a character due to removals they received are reset at the end of that character’s turn, which gives them just enough time to inflict better removals to compensate for the removals they received.
“Max AP” and “Max MP” removals, as well as Range removals, do not depend on FoW and don’t increase it either.
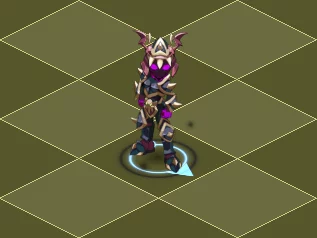
2.8 – Stabilized, Destabilized
Some spells and mechanics give the Stabilized state. This state can be seen on the character’s sheet and as a black circle around that character :
This state prevents all movement except walking. Therefore, the wearer of that state cannot :
- be pushed ;
- be attracted towards a tile, or charge towards a tile ;
- be teleported or teleport themselves ;
- be swapped with someone or swap themselves with someone ;
- undergo an orientation change, whether it’s from spells (Masqueraider, Osamodas, Sram, monsters) or from mechanics (Milkar, Shadowfang, or the About-Turn sublimation).
The inability to charge, teleport themselves or swap with someone also has the consequence of prohibiting the use of some spells that have these kinds of effects.
He can’t use Dairy Springer on an empty tile because he can’t teleport himself.
However, he can cast the spell directly on an entity, since there isn’t any teleportation involved in that case.
When a fighter gets Stabilized by one of the two teams, they also get the Destabilized state which prevents the wearer from being Stabilized by the same team for 3 turns. They can still be Stabilized by the other team.
The remaining turns of the Destabilized status are independent. For example, you can simultaneously have “Destabilized – allies” with 1 turn remaining and “Destabilized – enemies” with 2 turns remaining.
Another thing : as mentioned previously, if a fighter applies Stabilized to another, the latter will gain the corresponding Destabilized state (“allies” or “enemies” depending on the caster and the target).
However, if the fighter that applied the Stabilized state dies, the Stabilized state disappears, but the corresponding Destabilized state does too. The target can then be Stabilized again by the same team.
2.9 – 3×3 Bosses
Some bosses are giants and occupy 9 tiles at the same time. It’s a 3 by 3 square.
Therefore, we call them 3×3 Bosses.
A 3×3 Boss behaves differently from other monsters and Bosses :
- It ignores Lock.
- Each player only has to roll the Dodge calc once per turn. After that, one can freely move until their next turn.
- It can’t be moved or teleported by the player team.
- … with some rare exceptions, like the S.I.D. against Ogrest.
- Melee Mastery, as well the sublimations Ambush and Distant Ambush, are based on the Boss tile that is the closest to the caster. See the image below.
- Therefore, it’s possible to cast a spell with a minimum range of 3 while still dealing Melee damage as long as we’re at a range of 2 tiles and we’re targetting a tile that isn’t the closest one.
In orange, the tiles that are 2 range from the Boss (and which activates Distant Ambush)
A character on a red or orange tile is considered to be in Melee range of the Boss. Beyond that, they are at Ranged range.
- Some other conditions are based on the Boss’ middle tile, like orientation “front, side, rear” and its corresponding multiplier (and the Destruction sublimation), or alignment, notably for the Length sublimation (even though Length requires you to be at 3 range or more instead of 2).
2.10 – Flaming
Flaming is a state that, at the start of the wearer’s turn, explodes and deals damage to opponents at 1 range around the wearer.
Flaming damage is indirect. However, unlike most indirect damage sources, it does not penetrate armor.
Flaming damage is calc’d with a base damage value, just like spells. This value is equal to the state level.
Flaming level is capped to 200% of the fighter’s level.
A level 200 fighter can then have up to Flaming 400 which deals 400 base damage to opponents in contact.
However, to prevent abuse of this mechanic, any opponent can only take damage from an explosion once, which means they can only take damage twice at most (one hit from the initial activation, and one hit from an explosion caused by the death of an other opponent).
Flaming can’t be a critical hit. Critical Mastery is never used.
Flaming is unaffected by orientation, and therefore can’t make use of side or rear multipliers or Rear Mastery.
Applicable Masteries, except Critical and Rear, are taken into account for damage calc.
If an opponent at 3 tiles from the wearer is hit by an explosion from another opponent, Ranged Mastery is used instead of Melee Mastery.
2.11 – Damage redirection
Some spells and mechanics redirect damage received by allies to self. Damage calc depends on the type of protector.
For monsters (Enraged Boohemoth (96), Tattoorlwind (201)) :
- Damage received by the protector are based on their own resistances, as if they were the target of the spell.
- Activation of Ranged/Melee Mastery and sublimations depend on the protector’s position, as if they were the target of the spell.
For the Protoflex sidekick, it’s the same thing, with an added teleportation :
- It teleports itself before receiving the damage : it pushes the protected by 1 tile and takes their place, then receives the attack.
- Weirdly enough, applying Stabilized on Protoflex doesn’t prevent it from teleporting itself to the protected’s tile.
- If the ally can’t be moved (because they’re Stabilized or stuck), the teleportation doesn’t happen.
- Whether the teleportation happens or not, Protoflex receives the damage, based on its own position and resistances.
- When the teleportation doesn’t happen, a Melee attacker may be forced to deal Ranged damage to Protoflex (therefore with Ranged Mastery and Ranged %di), and vice versa.
For players (except Protoflex), the damage the protector receives is based on the damage that the ally is supposed to take (more or less) :
- Damage is based on resistances and the orientation of the protected, not the protector.
- Melee/Ranged Mastery activation and sublimations activation depend on the position of the protected.
- For example, the Ambush sublimation only activates if the attacker is in contact with the protected. The position of the protector is never used.
- Barrier and Block behave differently based on the protector, see below.
Regarding player Barrier and Block :
- For Sacrier‘s Sacrifice and for the Foggernaut‘s Blockade (from Earthy Assistance), the Barrier and Block of the targetted ally reduce the damage taken.
- Damage received by the Sacrier or the Blockade is therefore a complete copy/paste of the damage the ally was supposed to take.
- For Feca‘s Bastion, the damage the Feca will receive is calc’d before the Barrier and Block of the targetted ally. These stats won’t reduce the damage that the Feca will take.
- Barrier and Block of the targetted ally will only affect the damage that the ally will take, after having substracted the amount that the Feca receives via Bastion.
- The Feca can Block the damage they’re receiving, but the Barrier won’t be applied.
- Here’s an example : the ally is supposed to take 7200 damage, but they have 800 Barrier and successfully performs a Block.
- Bastion substracts a fourth of the 7200 initial value, which is 1800, before the ally Barrier and Block are triggered. The ally will take the remaining 5400 damage.
- The Feca has to take 1800 damage, unless they Block, which reduces that value to 1440.
- The ally has to take 5400 damage, but has 800 Barrier, which reduces the value to 4600.
The ally then performs a Block, which reduces the value to 3680 damage taken.
2.12 – Death and resurrection
A fighter that loses all of their HP dies.
If a fighter (player or monster) dies while they were controlling one or several summons, these summons also die.
Death behaves differently depending on the type of fighter.
A summon that dies is immediately disembodied and kicked from the fight.
A player that loses all of their HP is K.O.‘d and has 3 rounds before being disembodied and kicked from the fight. In that state, if they get hit, they lose 1 round.
Before being disembodied, they can be revived by an ally with certain spells. In that case, the character comes back to life with a part of their HP, and resumes playing their turn in the usual order of initiative.
However, this is their last chance :
- They also gain the In Recovery state which prevents them from being revived again.
- Also, if the ally who revived them dies, they also die and are immediately disembodied.
Most monsters will be immediately disembodied when they die and won’t get the K.O. state.
The few monster families that can be K.O.’d are those that can be revived, either by allies (Tropickles) or by themselves (Chafers, Northern Chafers)
2.13 – Anti-blocking
In dungeons, to prevent abuse which involves blocking a monster to prevent it from playing (also called “boxing”), most monsters have an anti-blocking mechanic.
At the start of the turn of a monster, if it has no free tile at 1 range (due to obstacles and/or some tiles being off-arena), the monster is considered blocked, and a warning is given in the “Fight Log” in-game channel : this monster “does not want to be blocked during the next two turns”.
Once 2 turns have passed, the monster can be blocked again without consequences, but the warning will be active again for 2 turns.
Each time a monster is blocked at the start of its turn while its warning is active, the anti-blocking mechanic activates :
- The monster swaps places with any player.
- This swap will always happen, even if the player and/or the monster have the Stabilized state.
- The player gets the It’s a case of the biter bit state which gives several harmful effects for their next turn :
- -6 max AP ;
- -3 max MP ;
- Stabilized.
- This Stabilized state wears off at the end of the player’s turn, instead of lasting an entire round.
- This Stabilized state does not give the Destabilized state.
Lock and/or the lack of MP can never be the cause of anti-blocking activation. Only the surrounding tiles are important.
A monster that isn’t able to move due to Lock and/or lack of MP is not blocked as long as there’s at least one surrounding free tile at 1 range.
Triggering the anti-blocking mechanic doesn’t prematurely stop the warning timer, but doesn’t refresh it either.
Therefore, trying to block the same monster every turn will create a cycle of “warning, trigger, trigger, warning, trigger, trigger, etc.”
Some monsters have a start-of-turn action that makes them move their surrounding enemies when blocked. In that case, the warning (or the state) is given only if the monster is still blocked after the start-of-turn action.
2.14 – Stats and Sublimations on summons
In summon descriptions, the game indicates that they copy the characteristics of the summoner at the start of the fight, and that, with some exceptions that depend on the type of summon (e.g. a difference in AP or MP), “all other characteristics are transferred as-is”.
Summons copy the summoner’s stats at the start of the fight.
This “at the start of the fight” copy is based solely on the character sheet.
The result is that :
- Buffs gained during the fight aren’t transferred to summons.
- Stats that aren’t visible on the character sheet, such as % Heals Received or conditional %di, aren’t transferred to summons.
- Summons don’t wear Sublimations. However, they can copy the character sheet after the sublimation has granted its bonus to the summoner.
- Out-of-fight effects are copied only if they’re visible on the character sheet (such as Swiftness which gives 1 MP and -10%di out of fight, visible on the sheet).
- Start-of-fight effects are copied only if they’re visible on the character sheet and only if they activate before the summoner’s stats are copied.
You will find a summary table with our tests below.
3 – You like math ?
3.1 – A ton of resistances isn’t always the solution
For defensive capabilities of a character, one may be tempted to focus solely on resistances, but we shouldn’t forget max HP, which is important for several reasons.
The first reason is EHP, or Effective Health Points.
This is a measure of a character’s defense. Roughly speaking, the defense provided by HP and defense provided by resistances are multipled together.
As a result, it’s better to have 10,000 HP and 50% resistances, rather than 18,000 HP and 0% resistances, or rather than 1,800 HP and 90% resistances.
The general idea is that, when two stats are multiplicative to each other, it’s better to balance them rather than just focusing on one of them.
This can be seen by calculating the area of a rectangle with a fixed perimeter by changing its length and width :
1 x 7 < 2 x 6 < 3 x 5 < 4 x 4.
This reasoning can be extended to damage, since Masteries and %di also are multiplicative to each other.
The second reason against neglecting HP is that they impact Healing resistance, Erosion and max armor. Having more max HP means the Healing resistance increases more slowly, and you can carry more armor due to higher max armor, which can also contribute to slower Healing resistances increases (since a greater amount of armor means you lose fewer Health Points in a fight).
This doesn’t mean you should focus on max HP only. Armor and healing provide a greater amount of EHP when you have more resistances, since the HP provided by armor and healing are lost more slowly when you take damage. As mentioned earlier, the idea isn’t to focus on a single parameter, but rather to balance both (max HP and resistances).
Therefore, choosing an item isn’t only about Masteries and resistances. Pay attention to HP !
You can (again-again !) refer to Ectawem’s calculator to calculate your EHP and compare two items, or even compare two builds.
3.2 – Damage calculation
Never four without five : you can refer to Ectawem’s calculator to calculate your damage.
3.2.1 – Increase
- On a critical hit, base damage is multiplied by 1.25.
- This multiplication, along with other potential multipliers applied directly to the base damage, are done first, and the result is rounded down.
- For some unknown reason, Foggernaut’s Hypertension behaves differently and applies after the round down.
- After that…
- Applicable Masteries are added together to form a multiplier.
- 1 Mastery point is +1% damage, added to our damage (which starts at 100%).
- 1 Mastery gives 100% + 1% = 101% total damage, i.e. a multiplier of x1.01.
- 100 Mastery gives 100% + 100% = 200% total damage, i.e. a multiplier of x2.
- 900 Mastery gives 100% + 900% = 1000% total damage, i.e. a multiplier of x10.
- etc.
- 1 Mastery point is +1% damage, added to our damage (which starts at 100%).
- Applicable %di is added together to form a multiplier.
- We also start from a base of 100%, so +80%di on the sheet gives a total of 180%, which is a multiplier of x1.8.
- % final damage are separate multipliers are not added together.
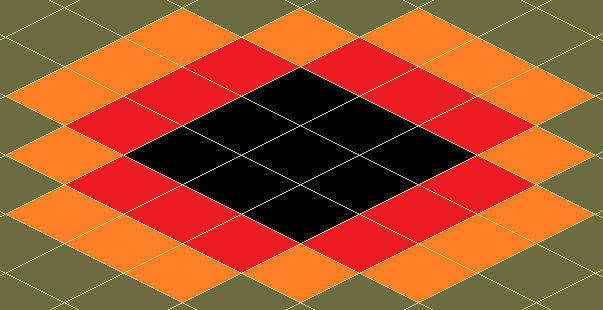
- If we hit the target’s side, damage is multiplied by 1.10. If we hit the target’s rear, damage is multiplied by 1.25.
- See the image below to see where the front, side, and rear are.
- All of these increases are multiplied together and multiply the base damage. Then, we have “fixed damage”, which is added to the total, after the opponent’s resistance has been applied.
- For example, the Eternal Sword can add +800 fixed damage after applying resistances.
Here’s a diagram for the orientation multiplier.
– If we hit the Blockade from a green tile, damage is from the front.
– If we hit the Blockade from a orange tile, damage is from the side.
– If we hit the Blockade from a red tile, damage is from the rear.
and that each diagonal belongs to the zone with the lowest multiplier.
The “front/side” diagonal therefore acts as “front”, and the “side/rear” diagonal acts as “rear”.
Resistance removal can be considered as a damage multiplier, see values below.
These values are only theoretical, because resistances after a removal can vary by 1% depending on the raw resistance value before the removal (which may or may not allow the target to reach the next resistance threshold after the removal)
- Removing 50 resistances multiplies damage by x1.118 approximately.
- Removing 100 resistances multiplies damage by x1.25.
- Removing 150 resistances multiplies damage by x1.3975 approximately.
- Removing 200 resistances multiplies damage by x1.5625.
3.2.2 – Decrease
As mentioned earlier, the maximum resistance for the player team is 90%, which is reached at 1032 raw resistances.
Critical resistance and Rear resistance are added to raw resistances when applicable (but do not allow the team to exceed the 90% resistance limit)
Once that sum is calc’d, the resistance percentage is obtained using the following formula :
“%resistances” = [1 – 0,8^(Resistance / 100)] Never five without six : the source is Ectawem’s calculator.
This formula works even when resistances are negative : having -100 total resistances gives -25%, having -200 total resistances gives -56%, etc.
In-game, resistances are obtained in 1% increments. As a result, two very similar raw resistance values can yield the exact same resistance percentage (therefore no difference in damage reduction). The different increments are :
That’s a lot of references to that calculator, right ?
The numbers in red are only reachable by enemy monsters.
The way the formula works means that the same gain (or loss) of resistances always provides (or removes) the same amount of damage mitigation, regardless of how many resistances the fighter had previously (except for players reaching over 1032 resistances).
For example, with a 100 resistances gain :
- Going from 1 resistance to 101 resistances brings our resistance from 0% to 20%, which is a 20% reduction in damage taken compared to what we were taking previously. (80 / 100 = 0.8)
- Going from 101 resistances to 201 resistances brings our resistance from 20% to 36%, which is a 20% reduction in damage taken compared to what we were taking previously. (64 / 80 = 0.8)
- Going from 851 resistance to 951 resistances brings our resistance from 85% to 88%, which is a 20% reduction in damage taken compared to what we were taking previously. (12 / 15 = 0.8)
Therefore, an increase in resistances can be considered as a damage received multiplier :
- Gaining 50 resistances multiplies the damage received by approximately x0.894.
- Gaining 100 resistances multiplies the damage received by x0.8 (a 20% decrease).
- Gaining 150 resistances multiplies the damage received by approximately x0.716.
- Gaining 200 resistances multiplies the damage received by x0.64 (a 36% decrease).
However, these multipliers are only theoretical : the percentage resistance system in increments means that the defense provided is not always exactly the same : the resistances percentage after a resistances gain can vary by 1% depending on the raw resistance before the gain (which may or may not make the fighter reach the next %resistance increment).
For example, going from 201 resistances to 301 resistances brings our resistance from 36% to 48%, which is a 18.75% reduction in damage taken compared to what we were taking previously, instead of the usual 20% we saw in the previous examples. (52 / 64 = 0.8125)
For the other damage reductions, there are, in order :
- A decrease in %di of the caster (whether it’s from a removal on the caster or a “-X% damage received” state on the target).
- Reminder that, with few exceptions, this decrease is additive to the caster’s %di and not a separate multiplier.
- The target’s Barrier that reduces received damage by a fixed amount. It’s activated after the damage calc, which includes resistances and added fixed damage.
- If received damage is less than the Barrier after calculation, it’s cancelled and we see a “-0”.
- The target’s Block, which acts last, and, upon activation, multiplies received damage by x0.8.
- Therefore, going from 0% to 100% Block is basically the same thing as gaining 100 resistances (unless the target has some Barrier, which acts before the Block, implying that the Block won’t be applied to all of the received damage).
- If the sublimation Blocking Expert is equipped, Blocking the damage multiplies received damage by x0.68 instead of x0.8.
At 100% Block, applying this sublimation is basically a 23 resistances gain (unless there’s some Barrier).
The damage decrease is similar to a 73 resistances gain (unless there’s some Barrier), but the sublimation removes 50 resistances.
3.2.3 – An example
A level 200 Huppermage casts a Twilight Beam at 3+ range as a critical hit, using all of his QB.
Here are his stats :
- 6000 Mastery in one element, 960 Ranged Mastery, 800 Critical Mastery
- A total of +89%di
The target has 63% resistance, as well as 100 Barrier, and they successfully Block. They are hit from the side. Let’s calculate inflicted damage.
First, base damage, and base damage multipliers :
- Base damage : 108 (displayed on the spell).
- Be aware that, for levels other than 200, there’s probably a hidden decimal part that is used in the incoming calc.
- %fd : +50% on Twilight Beam when having max QB.
- Associated multiplier : x1.5
- Multiplier on critical hit : x1.25
We get 108 x 1.5 x 1.25 = 202,5.
This is rounded down, i.e. 202.
- Total Mastery : 6000 + 960 + 800 = 7760
- Associated multiplier : x78.6 (1 + 7760/100 = 78,6 or 100% + 7760% = 7860%)
- Total %di : 89%
- Associated multiplier : x1.89
- Orientation : Side
- Associated multiplier : x1.1
- Enemy resistances : 63%
- Associated multiplier : x0.37 (1 – 0.63 = 0.37 or 100% – 63% = 37%)
We multiply everything together, which gives 202 x 78.6 x 1.89 x 1.1 x 0.37 = 12213.218556.
We didn’t round the result because the game doesn’t either.
We then apply, in order :
- Enemy Barrier : 100.
- Damage after Barrier : 12213.218556 – 100 = 12113.218556.
- Block multiplier : x0.8.
- Damage after Block : 12113.218556 x 0.8 = 9690.5748448.
In this final value, the decimal acts as a chance to add +1 to our damage.
Therefore, the spell has a 57.48448% chance of dealing 9691 damage, and a 42.51552% chance of dealing 9690 damage.
3.3 – Heals calculation
Hey, you know what ? You will never guess what resource you can use to calculate your heals… it’s Ectawem’s calculator !
This article isn’t sponsored by Ectawem’s calculator.
3.3.1 – Increase
- On a critical hit, base heal value is multiplied by 1.25.
- This multiplication, along with other potential multipliers applied directly to the base heal, are done first, and the result is rounded down. After that…
- Applicable Masteries are added together to form a multiplier.
- For a self-heal, the Melee Mastery is used.
- Rear Mastery is never used. There’s no orientation multiplier either.
- 1 Mastery point is +1% heal, added to our heal (which starts at 100%).
- 1 Mastery gives 100% + 1% = 101% total heal, i.e. a multiplier of x1.01.
- 100 Mastery gives 100% + 100% = 200% total heal, i.e. a multiplier of x2.
- 900 Mastery gives 100% + 900% = 1000% total heal, i.e. a multiplier of x10.
- etc.
- Applicable %heals is added together to form a multiplier.
- We also start from a base of 100%, so +80%heals on the sheet gives a total of 180%, which is a multiplier of x1.8.
3.3.2 – Decrease
Elemental resistances aren’t used. The stats we use are Healing Resistance and Incurable which we talked about earlier.
Reminder that both of these stats are separate multipliers.
If I have 20% Healing Resistance and Incurable 5 (50%), I have x0.8 and x0.5 which gives a total multiplier of x0.4 ; I will only receive 40% of heals, which is a total decrease of 60% on heals.
3.4 – Rear and crits don’t always deal the most damage
The rear and crit multipliers are x1.25 each (not counting the round down for critical hits).
Each multiplier is offset by a +100 resistances gain (which should be a x0.8 multiplier, but there might be a 1% resistance difference due to the increments mentioned earlier).
Therefore :
- With at least 100 effective critical resistances (i.e. not exceeding 1032 resistances), taking a critical hit does as much damage as a non-critical hit, or less damage even.
- With at least 100 effective rear resistances (i.e. not exceeding 1032 resistances), taking rear damage does as much damage as front damage, or less damage even.
- In that case, the most dangerous hits are from the side, and the least dangerous ones are from the rear.
- This also means that we should willingly turn our back. This also encourages monsters to attack us instead of allies because monsters like to deal rear damage.
- In the same idea, with at least 58 effective rear resistances, taking rear damage does as much damage as side damage, or less damage even.
3.5 – Drop rate calculation
There are several ways to increase drop rate :
- The Prospecting stat, capped at 200 after applying Challenges, steles bonuses, and consumables.
Each Prospecting point gives +1% drop rate, which acts as a multiplier.
It’s the same thing as Masteries, %di, etc.- Just like other percentage increases, we start from 100%, so 200 Prospecting brings us to 300%, which is a x3 drop rate multiplier.
- The loot bonus from Booster is a multiplier (x1.5 on the Ogrest server, x1.25 otherwise).
- The loot bonus from dungeon difficulty is a multiplier.
- The Loot Potion (+50%) is added to that multiplier, in the same way as %di are.
- The Demonic Pact bonus is added too (+25% on Cautious, +50% on Opportunist).
If I have 250% loot thanks to dungeon difficulty, and I add a Loot Potion and a Cautious Pact, I get 250% + 50% + 25% = 325% loot.
As a result, the higher the dungeon difficulty, the less noticeable the change in drop rate from a Potion or Pact. On Stasis 10 difficulty, a Loot Potion brings us from 710% to 760%, which is an increase of only 7% more loot.
For example, with 200 Prospecting, a Booster on the Rubilax server (x1.25), a loot bonus of 400% from dungeon difficulty (Stasis 5 on competitive mode), a +50% bonus from a Loot Potion and a +50% bonus from the Opportunist Pact…
… an item with 1% base drop rate goes to 18.75%.
4 – Advanced techniques
4.1 – Getting line of sight
Usually, when one doesn’t have line of sight and wants to get it, one moves towards a general direction, knowing that “it will work”.
However, some situations require extra precision to avoid taking several attempts and wasting MP, or even realizing too late that line of sight wasn’t accessible anyway with the amount of MP we had.
Therefore, one may want to know in advance if they can get line of sight after a specific move.
Everything that follows takes place on flat terrain (or almost flat). I haven’t yet extended the concept to significant altitude differences that would block the line of sight.
4.1.1 – How does it work
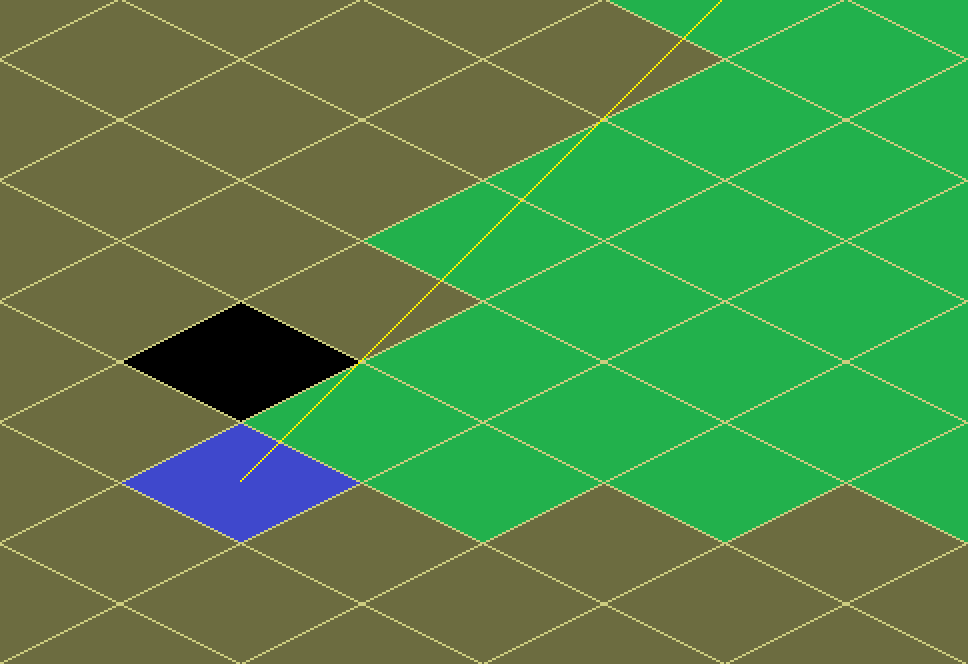
Basically, line of sight is a straight line drawn between two points : the center of the caster’s tile, and the center of the target’s tile.
To have line of sight, this straight line must not cross any occupied tile.
An obstacle that has the Transparent state never blocks line of sight.
For the green tile, there are no obstacles on the path, so it’s in line of sight.
For the red tile, the straight line goes through the black tile (which is our obstacle), so this tile isn’t in line of sight.
When there’s an obstacle, this concept can be extended visually by considering all tiles in line of sight as an area delimited by the straight line that is the closest to the obstacle (but without crossing the tile, otherwise we wouldn’t have line of sight). This line therefore touches one of the corners of the obstacle’s tile :
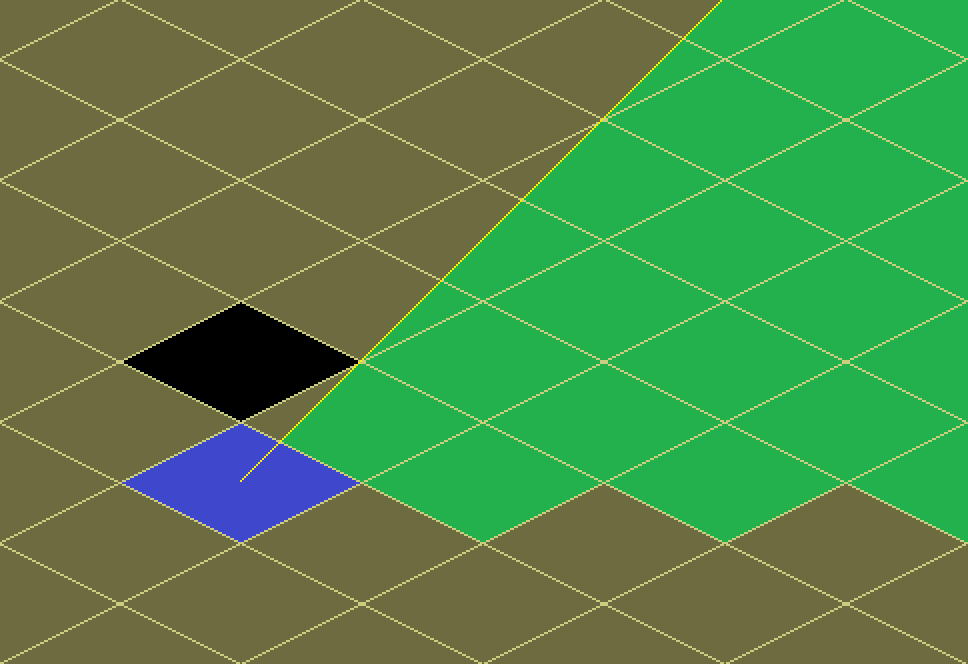
However, let’s keep in mind that a tile can not be partially in light of sight, and that a tile is in line of sight only when its center is inside that area. Therefore, the actual area is :
4.1.2 – Perfect tiles
To find the area described above, one has to be able to mentally draw the straight line that is the closest to the obstacle (without crossing it), which is touching the corner of that tile.
To find this line, there’s a method that becomes easy to use once you get used to it. The explanation that follows will be quite long, but over time it becomes a quick visual habit, a matter of three seconds or less : you look for the “perfect tile”.
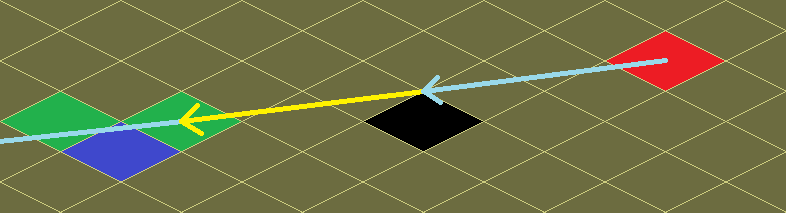
Let’s consider the straight line that is the closest to the obstacle. That line will always go through the exact center of a tile, which we will call the “perfect tile” :
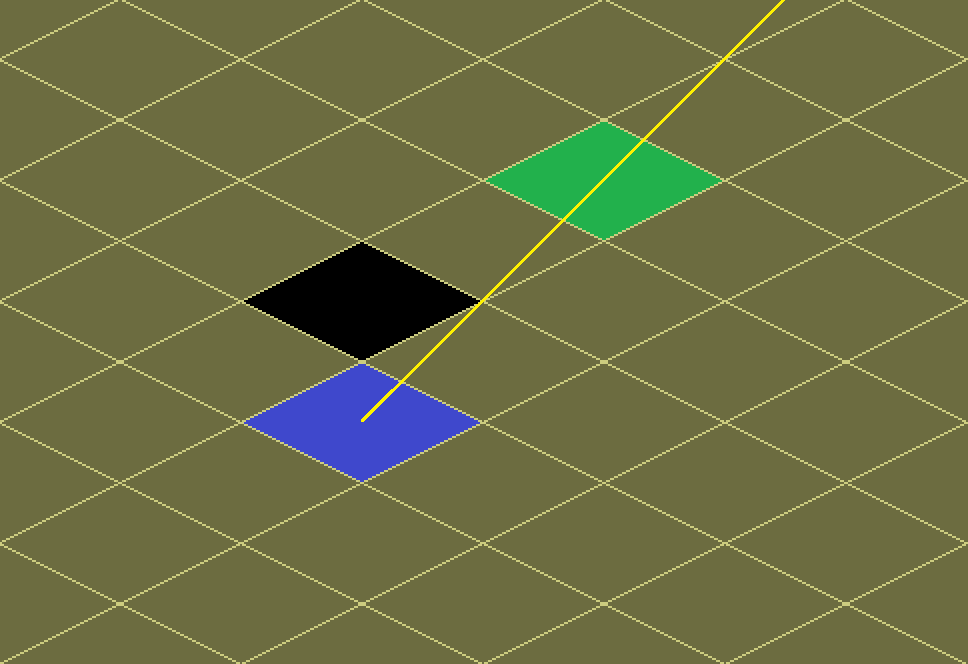
It turns out that this tile is obtained by central symmetry (the center being the corner of the obstacle tile).
Think of that corner as “acting like a mirror” that repeats the path from the caster’s tile to the corner of the obstacle. This path is a straight line and the repeated path is an extension of the first, which “lenghtens” our straight line and brings us exactly to the center of the perfect tile :

In blue, the path that is an extension of the first path, and equal to the first path.
In this article, we’ll keep drawing arrows, but if that doesn’t seem intuitive enough, we can consider other visual methods that you can apply in-game. Here’s an example with several visual methods :
Arrows method :

Tile counting method :
to reach the corner of the obstacle (see yellow numbers “1, 2, 3” and orange “1”).
We then count the same number of tiles after having “crossed” the corner of the obstacle (blue numbers).
L-shape method :
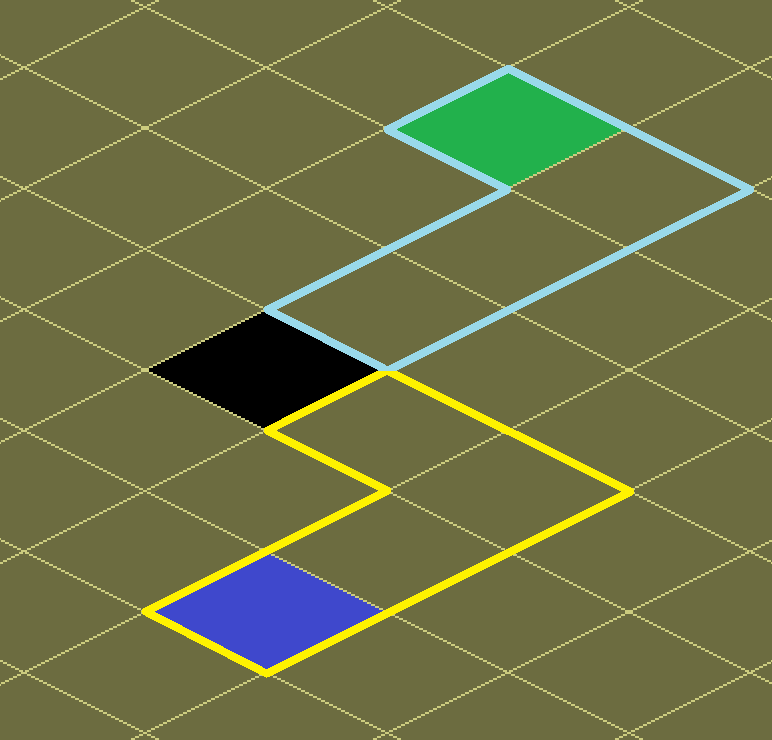
We simply need to reproduce this L shape on the other side (blue).
Rectangles method :
We reproduce this rectangle on the other side (blue).
In this new rectangle, the corner opposite to the corner of the obstacle is the perfect tile .
It’s up to you to choose your own methods. I tend to look for an L-shape when the situation is in a small area (or “easy” area), and count the tiles when it’s over a larger area (or “difficult” area).
Here, we’ll continue using arrows for a better explanation.
If the tile we are looking for is too far away, we can extend this new path in its entirety (so the yellow arrow and the blue arrow, not just the yellow one) to obtain a second perfect tile.
If needed, this red path can be repeated as many times as necessary to obtain a perfect third tile, a perfect fourth tile, and so on.
One last thing.
Why do I keep calling these tiles “perfect tiles” ?
That’s because these are the only tiles that are visible through two obtacles that are diagonally 2 range apart :
as well as one perfect tile through the two Barrels.
Therefore, in this type of situation, you can use this technique by considering the target’s tile as the starting tile, to know the location of the perfect tile closest to the caster, and this tile will then be in line of sight of the target.
And that’s a nice transition to the last part.
4.1.3 – Where do I have line of sight ?
By finding these perfect tiles, we can visualize the straight line “touching” the obstacle.
By using the previous idea of “colored area that is in line of sight”, which is delimited by the straight line “touching” the obstacle, we can easily know if a tile is in line of sight.
For the green tile, the area is BELOW the nearest arrow. The tile is in line of sight because it’s inside the area.
For the red tile, the area is ABOVE the nearest arrow. The tile is not inside the area, so it’s not in line of sight.
And, even better, and this is the goal (and conclusion) of this line of sight lesson : if we start from the end instead of the beginning (i.e. we start the path from the tile we want to target), we can determine which tiles are in line of sight of the target in order to cast a spell on them :
However, thanks to the perfect tile (right green tile), we can see that only one MP is needed to get line of sight.
A second tile at 1 MP is available (left green tile) because it’s inside the area delimited by the arrows.
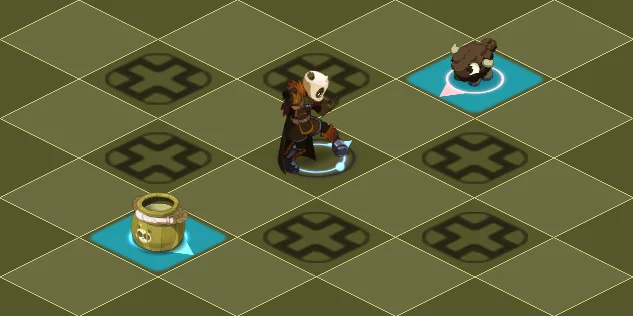
Now that the explanations are over, here are a few situations that have happened to me. The first one is an interesting example, but the next two can be exercises for you to solve on your own (with the solution below) if you want to practice :
Example 1 : (Already solved) Perfect tile through two obstacles
You’ll notice that one tile is slightly raised, but at that height, it doesn’t change anything ; just consider it to be at the same height as the others. You can also see that I deliberately placed the corner of the obstacle (small black dot) at the same height as the other tiles, and not on the raised corner.
The Enutrof started his turn on his Mine, which is next to him, but, by using the technique and starting the path from the Wolfix, the Enutrof realized that he only needed to move one tile to gain line of sight towards the Wolfix. Then, the spell could be cast.
Now, it’s your turn !
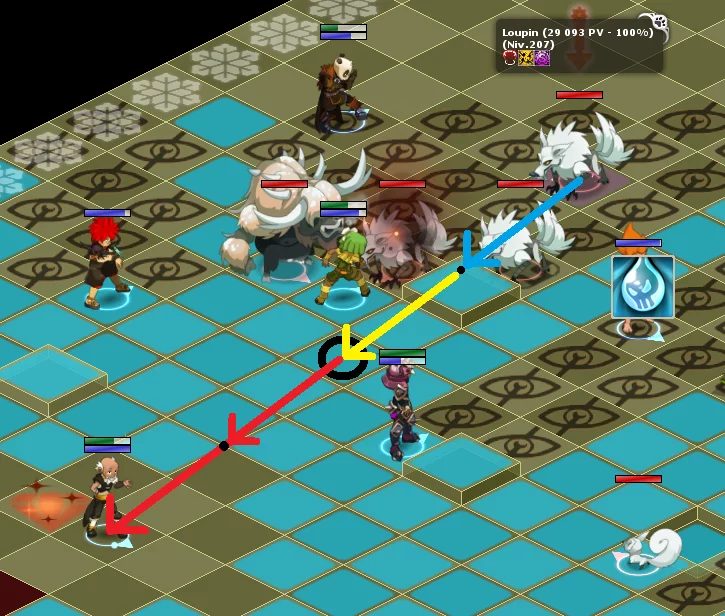
Example 2 : In the image below, assuming the Enutrof (on the far right) has the necessary Range and definitely doesn’t want to be locked by an enemy, how many MP does he need to get line of sight towards the Boss in the top left corner of the image ?
Note : the Enutrof can’t walk on the small crater between him and the tornado monster, crater that is mostly hidden by that monster. However, you can walk through the smoke it produces.
Solution :
Since there are two obstacles allowing a perfect tile through them, we can start the path from the Boss and see where it takes us.
If he doesn’t want to go in the arena borders, he has another path (left-hand path) available for 6 MP.
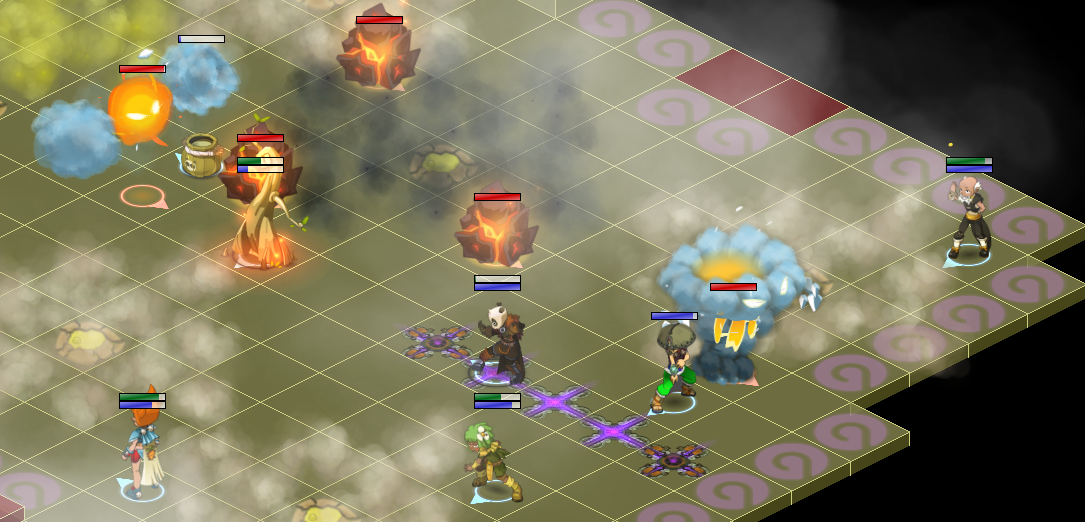
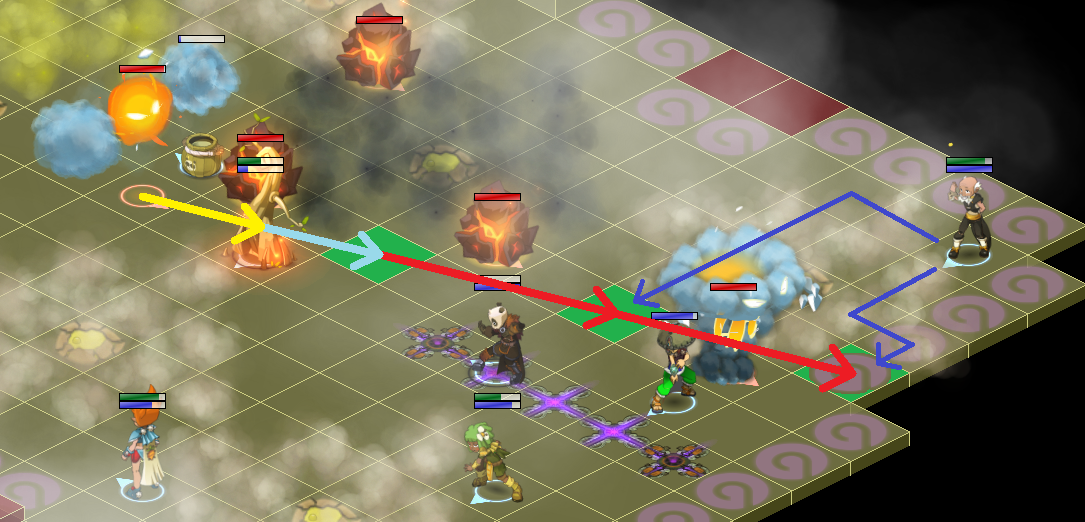
Example 3 : In the image below, the Feca (on the left) has 4 MP. Can he get line of sight towards the Foggernaut (top right corner of the image) ?
Solutions :
By using all 4 of his MP, he can find line of sight, even if it’s not obvious at first glance :
There are two obstacles : the upper path is for the monster, and the lower path is for the Sadida.
The area in line of sight is defined by these two paths and located between them.
But in reality, 3 MP are enough if you’ve considered the locations of the perfect tiles while starting from the blue tile below. This could be a better answer because it uses one less MP :
Practice during fights ! Eventually, finding those perfect tiles will be quick.